Last updated: October 13, 2026
Key Takeaways
- New sites usually get the most value from Bing Webmaster Tools through verification, sitemap submission, and crawl checks.
- Verify ownership with DNS, an HTML meta tag, an XML file, or a Google Search Console import.
- Start with your XML sitemap, then review key pages, then request indexing for the most important URLs.
- DNS is the most durable option if you can edit it; otherwise use the most stable method your platform supports.
If you are setting up Bing Webmaster Tools for a new website, the core move is simple: verify ownership, submit a clean sitemap, and inspect how Bing crawls your key pages. That is the fastest way to move from launch to discoverability, and it gives you early signals on indexing and technical issues.
The setup itself is not hard. The real decision is which verification method to use, what to submit first, and what to do when Bing reports a problem that Google never mentioned. I’ll walk through the cleanest path for a brand-new site and the cases where the standard advice breaks.
What Bing Webmaster Tools actually does for a new site
If your site is brand new, Bing Webmaster Tools gives you three things that matter fast: verification, indexing signals, and crawl diagnostics. Without it, you are guessing whether Bing even knows your domain exists. With it, you can submit a sitemap, request re-crawls, inspect URLs, and see technical issues like blocked pages or crawl errors.
For a new website, I would treat Bing Webmaster Tools as a day-one setup, not a “later if I remember” task. Bing’s search engine still sends meaningful traffic in some niches, especially on Windows-heavy desktops, older audiences, and markets where Microsoft products are common. That does not mean Bing should replace Google Search Console. It means the two tools solve the same basic problem from different directions.
If you are launching a simple site, the setup usually takes 10 to 20 minutes. If you are on WordPress, Wix, Squarespace, Shopify, or a custom build, the steps are almost the same, but verification can differ. The wrong move is overthinking the dashboard before you have ownership confirmed.
Here is the basic decision table:
| Situation | Best Path | Why Other Options Fail |
|---|---|---|
| Brand-new domain | Verify with DNS or HTML meta tag | Waiting for organic discovery can take weeks |
| WordPress site | Use the plugin or DNS verification | Manually pasting code often gets lost in theme changes |
| Shopify or hosted builder | Use DNS verification if possible | Header-code access is sometimes limited or overwritten |
| Site already on Google Search Console | Import from Google if offered | Import is convenient, but you still need to confirm the right property |
Quick check: if you do not yet know whether you control the domain DNS, your first task is not submission — it is picking a verification path you can actually complete.
How do I verify a new website in Bing Webmaster Tools?
You verify by proving you control the site through DNS, an HTML meta tag, an XML file, or an import from Google Search Console. The DNS method is usually the cleanest long-term choice because it survives redesigns and template changes.
Start here if you have a new domain and want the least fragile setup:
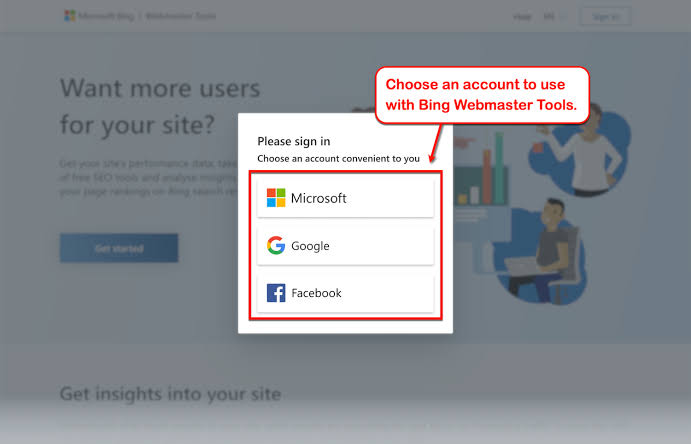
- Go to Bing Webmaster Tools and sign in with a Microsoft account.
- Add your website property using the exact preferred version of the domain, such as
https://example.comrather than a random variation. - Choose a verification method. If you can edit DNS, pick DNS. If not, pick meta tag or XML file.
- Copy the record, tag, or file exactly as Bing gives it to you.
- Publish the DNS record or place the tag/file in the site where Bing expects it.
- Return to Bing Webmaster Tools and click the verify button.
- Wait for confirmation. If it fails, check for typos, propagation delays, or the wrong domain version.
The DNS method often feels slower because DNS propagation can take from a few minutes to 48 hours, depending on your registrar and cache. That delay is normal. The HTML meta tag is faster to place, but it can disappear if your theme changes or if a plugin strips header code. The XML file method is fine if you can upload to the root directory and keep the file in place.
If you already verified the same site in Google Search Console, Bing may offer import options. That is useful, but I would still confirm the property manually afterward. Imports save time; they do not excuse sloppy setup.
A common mistake is verifying the wrong host version. http:// and https:// are not interchangeable, and www and non-www should not be treated like the same property unless you understand how your site resolves. Choose the version your site actually uses as the canonical home, and if you are unsure, consult a qualified SEO or developer source before locking it in. For domain versions and redirects, Google’s URL structure guidance and Bing’s webmaster documentation are the safest references. (Source: Google Search Central Bing Webmaster Guidelines)
Quick check: if you cannot explain which URL version your homepage should live on, pause and fix that before you verify anything.
What should I submit first after verification?
Submit your XML sitemap first, then inspect your top pages, then request indexing for the most important URLs. That order gives Bing a map before you ask it to go hunting.
A sitemap is not a magic ranking file. It is a list of URLs you want crawled. For a new website, it matters because Bing has no historical understanding of your structure. A clean sitemap reduces guesswork and helps Bing discover important pages faster. Google’s sitemap guidance is still a useful reference here because the same basic principle applies. (Source: Google Search Central)
Use a sitemap that contains only indexable, canonical URLs. If your sitemap includes noindex pages, parameter URLs, or duplicate versions, you are sending mixed signals on day one. WordPress sites often generate sitemaps automatically through plugins or core tools; Shopify and other hosted platforms may create them by default. The file is commonly called sitemap.xml, but what matters is that the URLs inside are the right ones.
- Find your sitemap URL, usually `/sitemap.xml` or a sitemap index file.
- Open the sitemap in a browser and make sure it loads without a 404.
- In Bing Webmaster Tools, go to the sitemap submission area.
- Add the sitemap URL and submit it.
- Check whether Bing reports the file as read successfully.
- Open your key pages in the URL inspection or URL submission area.
- Request indexing only for pages that are live, canonical, and worth indexing.
If you are launching with only a few pages — say 5 to 20 — you can inspect them one by one. If you have hundreds of product pages or articles, I would focus on category pages, homepage, and the strongest 10 to 20 URLs first. Bing does not need every thin page pushed at once.
The wrong advice here is “submit everything immediately.” That leads people to push draft pages, staging URLs, duplicate category paths, and tag archives. Bing cannot reward pages you do not want in the index.
Quick check: if your sitemap contains pages you would be embarrassed to show a customer, clean the sitemap before you submit it.
Which setup path should I use for my platform?
If you can edit DNS, use DNS verification; if you cannot, use the easiest stable method your platform supports. The right setup depends less on SEO theory and more on who controls your site files.
For a straightforward comparison:
| Situation | Best Path | Why Other Options Fail |
|---|---|---|
| Domain registered at a host you control | DNS verification | Most durable across redesigns and platform changes |
| WordPress with admin access | DNS or SEO plugin verification | Theme-based meta tags can vanish on updates |
| Wix / Squarespace / similar builders | Platform’s built-in verification or DNS | File upload access is often limited |
| Shopify | DNS verification if available | Some theme edits get overwritten by store changes |
| Multiple subdomains | Verify each property you want indexed | One property does not automatically cover all subdomains |
If I had to choose one path for most new websites, I would choose DNS. It is a little less friendly at the start, but it tends to stay intact when the site changes. That matters because new sites often change, especially during launches and redesigns.
A simple workflow for DNS verification:
- Log in to your domain registrar or DNS host.
- Open the DNS management area for the domain.
- Copy the exact TXT record Bing provides.
- Add it as a TXT record, not a CNAME or A record.
- Save the change and wait for propagation if needed.
- Return to Bing Webmaster Tools and verify.
- After verification, keep the record in place unless Bing tells you otherwise.
If your site is on a builder that makes DNS awkward and you only need a quick launch, the HTML meta tag is a reasonable second choice. I would not choose a method that only works if you remember to keep a certain plugin active, unless the site is small and stable.
Quick check: if someone else controls your DNS and you cannot get access within an hour, use the platform’s verification method instead of stalling the launch.
Why Bing says my site is verified but still not indexed
Verification means Bing knows you own the site; indexing means Bing has crawled and accepted pages for search. Those are different steps, and new site owners confuse them constantly.
If Bing shows your property as verified but you still have no impressions, check three things first: sitemap status, robots rules, and canonical tags. A verified site can still be invisible if the crawler is blocked, pointed at the wrong URL version, or told that every page is duplicate.
Start with the technical basics:
- Make sure
robots.txtis not blocking important folders. - Make sure important pages do not carry
noindex. - Make sure the canonical URL points to the preferred version.
- Make sure the pages return a 200 status, not a redirect loop or 404.
- Make sure the sitemap only includes live, indexable pages.
Bing Webmaster Tools has crawl and URL inspection features that help here. If a page is discovered but excluded, the reason usually appears in the report. That report is often more useful than the homepage dashboard, which can make a site feel “connected” when it is not actually search-ready. Bing’s own documentation explains how crawl and index diagnostics fit into the product. (Source: Bing Webmaster Tools Help)
If your site is very new — for example, a domain launched in the last 7 days — some delay is normal. Bing may need time to discover the site naturally even after verification. But if the site is still absent after you have submitted a sitemap and requested a few key URLs, something technical is usually wrong.
I would not chase backlinks or social promotion before fixing crawl access. Traffic can wait. Crawlability cannot.
Quick check: if your pages load in a browser but Bing still ignores them, the problem is usually technical, not promotional.
Edge cases where the normal advice breaks down
If any of these situations apply, the standard “verify and submit your sitemap” advice is not enough.
-
You are on a staging site or password-protected launch page.
What changes: Bing cannot reliably crawl a blocked environment.
What to do instead: move verification and sitemap submission to the public production domain, then remove password protection before requesting indexing. -
Your site uses heavy JavaScript rendering.
What changes: Bing may not see content the way your browser does.
What to do instead: check that important text and links are present in the HTML or rendered output, not only after user interaction. If the render setup is complex, consult a developer or technical SEO professional and verify the crawlable output with Bing’s inspection tools and Google’s JavaScript SEO guidance. Google Search Central -
You have both
wwwand non-wwwversions live.
What changes: Bing may split signals or crawl duplicates.
What to do instead: pick one canonical version, redirect the other with a 301, and submit only the canonical property. -
Your CMS generates lots of thin archive pages.
What changes: the sitemap can get noisy fast.
What to do instead: exclude tag archives, date archives, and low-value filters from the sitemap unless they serve a clear search purpose. -
You changed domains during launch.
What changes: Bing needs to understand the migration, not just the new home.
What to do instead: verify the new domain, submit the new sitemap, and make sure old URLs redirect cleanly to the new ones. -
Your site is multilingual.
What changes: Bing needs language and regional signals to avoid mixing pages.
What to do instead: keep separate language URLs, use correct hreflang if implemented, and submit a sitemap that reflects the site structure accurately.
Quick check: if your site has redirects, JavaScript-heavy pages, or duplicate URL versions, treat setup as a crawl-architecture task, not a checkbox exercise.
The setup mistakes I would avoid on day one
If you want a clean start, avoid the three mistakes that waste the most time: verifying the wrong property, submitting a dirty sitemap, and assuming indexing should be instant. Those errors turn a 15-minute setup into a week of confusion.
I would also avoid overcomplicating the account structure. A new website usually needs one primary property, one clean sitemap, and a handful of inspected URLs. That is enough to start. You do not need every report open at once, and you do not need to chase every warning before the site has even settled.
Another honest limitation: Bing Webmaster Tools is useful, but it is not a substitute for fixing the site itself. If your navigation is messy, your pages are thin, or your server is slow to respond, the tool will not rescue you. It will only show you the problem faster.
A simple launch checklist:
- Confirm the canonical domain version.
- Verify ownership with DNS if possible.
- Submit a clean sitemap.
- Inspect the homepage and top landing pages.
- Check robots, noindex tags, and canonical tags.
- Request indexing for a small set of important URLs.
- Return after a few days to review crawl and index status.
Quick check: if you are tempted to “just see what happens,” you probably need to slow down and make the canonical setup clean first.
Quick answers to common setup questions
If you want the shortest practical answer, here it is: verify with DNS, submit the sitemap, inspect your key pages, and fix crawl blockers before anything else.
- Do I need Bing Webmaster Tools if I already use Google Search Console? Yes, because Bing still provides separate crawl and indexing data.
- How long does verification take? DNS can take minutes to 48 hours; meta tags and file uploads are often faster.
- Should I request indexing for every page? No, start with the homepage, category pages, and other URLs that matter most.
- What if my site has just launched? Submit the sitemap and monitor Bing’s crawl reports before changing too much.
- Do I need special software? No, but a stable verification method and a clean sitemap are essential.
Drafted with AI; not yet reviewed by a person.